
Server for Reliable Data Protection: Deployment of secure hosting solutions
In the era of digital transformation, data protection is paramount to the successful operation and development of a business. Major cyber threats are costing businesses around the world billions of dollars.

Ubuntu 24.04 je nyní k dispozici na virtuálních serverech Host-telecom.com!
S potěšením oznamujeme, že Host-telecom.com nyní nabízí instalaci Ubuntu 24.04 na našich virtuálních serverech!
Často nás oslovují obyvatelé Turkmenistánu, kteří si chtějí pronajmout naše servery pro VPN. Shromáždili jsme nejčastější dotazy a připravili podrobné odpovědi.
-
Sociální sítě Facebook, Twitter, Instagram, YouTube, WhatsApp, Viber a Telegram messenger a mnoho dalších služeb jsou v Turkmenistánu blokovány. Navíc jsou blokovány jak jednotlivé IP adresy, tak celé podsítě. Mohu použít vaše servery k nastavení VPN pro Turkmenistán?
Důrazně nedoporučujeme používat naše služby k vytváření VPN na území Turkmenistánu! A proto:
- IP adresy používané pro VPN v Turkmenistánu jsou, pokud je nám známo, zablokovány během prvních několika dnů. Pro VPN se proto lépe hodí služby s hodinovou nebo denní platbou, aby se zbytečně nevyhazovalo peníze. Minimální doba, na kterou si můžete pronajmout naše virtuální servery: 1 měsíc;
- při objednávce VPS nevybíráme IP adresy. Může se ukázat, že vydaná adresa bude v Turkmenistánu již zablokována. Nemůžeme zaručit, že vámi objednaný VPS bude mít IP adresu neblokovanou v Turkmenistánu;
- neprovádíme bezplatné ani pravidelné rychlé změny IP adres na serverech. Doporučujeme používat služby, které se specializují na poskytování služeb VPN.
-
Pokud je IP adresa na mém serveru zablokována, můžete ji zdarma změnit?
Litujeme, ale ne. Blokování IP adres ve vaší zemi není důvodem pro bezplatnou změnu adresy IP?
-
Chci zaplatit za změnu IP adresy, je to snadné?
Můžete si zakoupit novou IP adresu, ale budete muset změnit i IP adresu na svém VPS. Pokud nevíte, jak to udělat, budete muset přeinstalovat operační systém prostřednictvím ovládacího panelu serveru, ale poté budou všechna data a nastavení serveru odstraněna. Chcete-li je uložit, můžete nás kontaktovat za zpoplatněnou službu správy systému.
-
Je možné pingnout vaše IP adresy, abyste zjistili, zda jsou blokovány nebo ne?
Máme velký fond IP adres pro servery. Nikdo nemůže zaručit, která adresa bude přidělena vašemu serveru v době objednávky. To dělá jakoukoli kontrolu bezvýznamnou, protože nezaručuje, že IP bude přístupná z Turkmenistánu.
-
Je možné někde vidět, zda je IP adresa blokována nebo ne?
Bohužel nemáme oficiální blocklisty. Jako každý poskytovatel hostingu se o problému blokování ze strany turkmenských úřadů dozvídáme až poté, co si uživatelé stěžují, že IP adresa již není dostupná.
-
Objednal jsem si VPS, ale IP adresa je již zablokovaná, změnu jsem zaplatil, ale nová je také zablokovaná. Lze zablokovat všechny vaše adresy?
Čím více zákazníků používá naše VPS k organizaci VPN v Turkmenistánu a čím prozíravěji to dělají, tím více IP adres je blokováno a tím obtížnější je získat odblokovanou adresu.
Residents of Turkmenistan who want to rent our servers for VPN often reach out to us. We have collected the most frequently asked questions and prepared detailed answers.
-
Facebook, Twitter, Instagram, YouTube, WhatsApp, Viber and Telegram messengers, and many other services are blocked in Turkmenistan. On top of that, individual IP addresses and entire subnets are blocked. Can I use your servers to set up a VPN for Turkmenistan?
We strongly discourage using our services to create a VPN on the territory of Turkmenistan! And here is why:
- according to our sources, IP addresses used for VPN in Turkmenistan are blocked within the first few days. Therefore, VPN services paid for on an hourly or daily basis are a better option to not waste money in vain. The minimum period for which you can rent our virtual servers is 1 month;
- we do not select IP addresses upon order of a VPS. The issued address may already be blocked in Turkmenistan. We cannot guarantee that the VPS you ordered will have an IP address that is not blocked in Turkmenistan;
- we do not perform a free or regular quick change of IP addresses on servers. Therefore, we recommend that you use services that specialize in providing VPN services.
-
If the IP address on my server is blocked, can you change it for free?
Sorry, but no. Blocking IP addresses in your country is not a reason for changing an IP address for free.
-
I want to pay to change the IP address. Is it easy to do?
You can purchase a new IP address, but you will have to change the IP address on your VPS. If you don't know how to do that, you will need to reinstall the operating system through the server control panel, but then all the data and server configuration will be deleted. To save them, you can contact us for a system administration service provided on a paid basis.
-
Is it possible to ping your IP addresses to find out if they are blocked or not?
We have a large IP pool for servers. However, no one can guarantee which address will be assigned to your server at the time of the order. This makes any testing pointless since it will not guarantee that the IP will be accessible from Turkmenistan.
-
Is it possible to check if the IP address is blocked or not?
Unfortunately, we do not have official block lists. Therefore, like any other hosting provider, we learn about the problem of blocking by the authorities of Turkmenistan only after users complain that the IP has stopped being available.
-
I ordered a VPS, but the IP address is already blocked. I paid for the change, but the new one is also blocked. Can all your addresses be blocked?
The more clients use our VPS to set up a VPN in Turkmenistan, and the more carelessly they do it, the more IP addresses are blocked and the more difficult it is to get an unblocked one.
Cloudový Compute můžete klonovat bez její zastavení. Existuje několik způsobů, jak toho dosáhnout.
1. Vytvoření snapshotu
Tato metoda je vhodná pro případy, kdy nepotřebujete odstranit původní instanci.
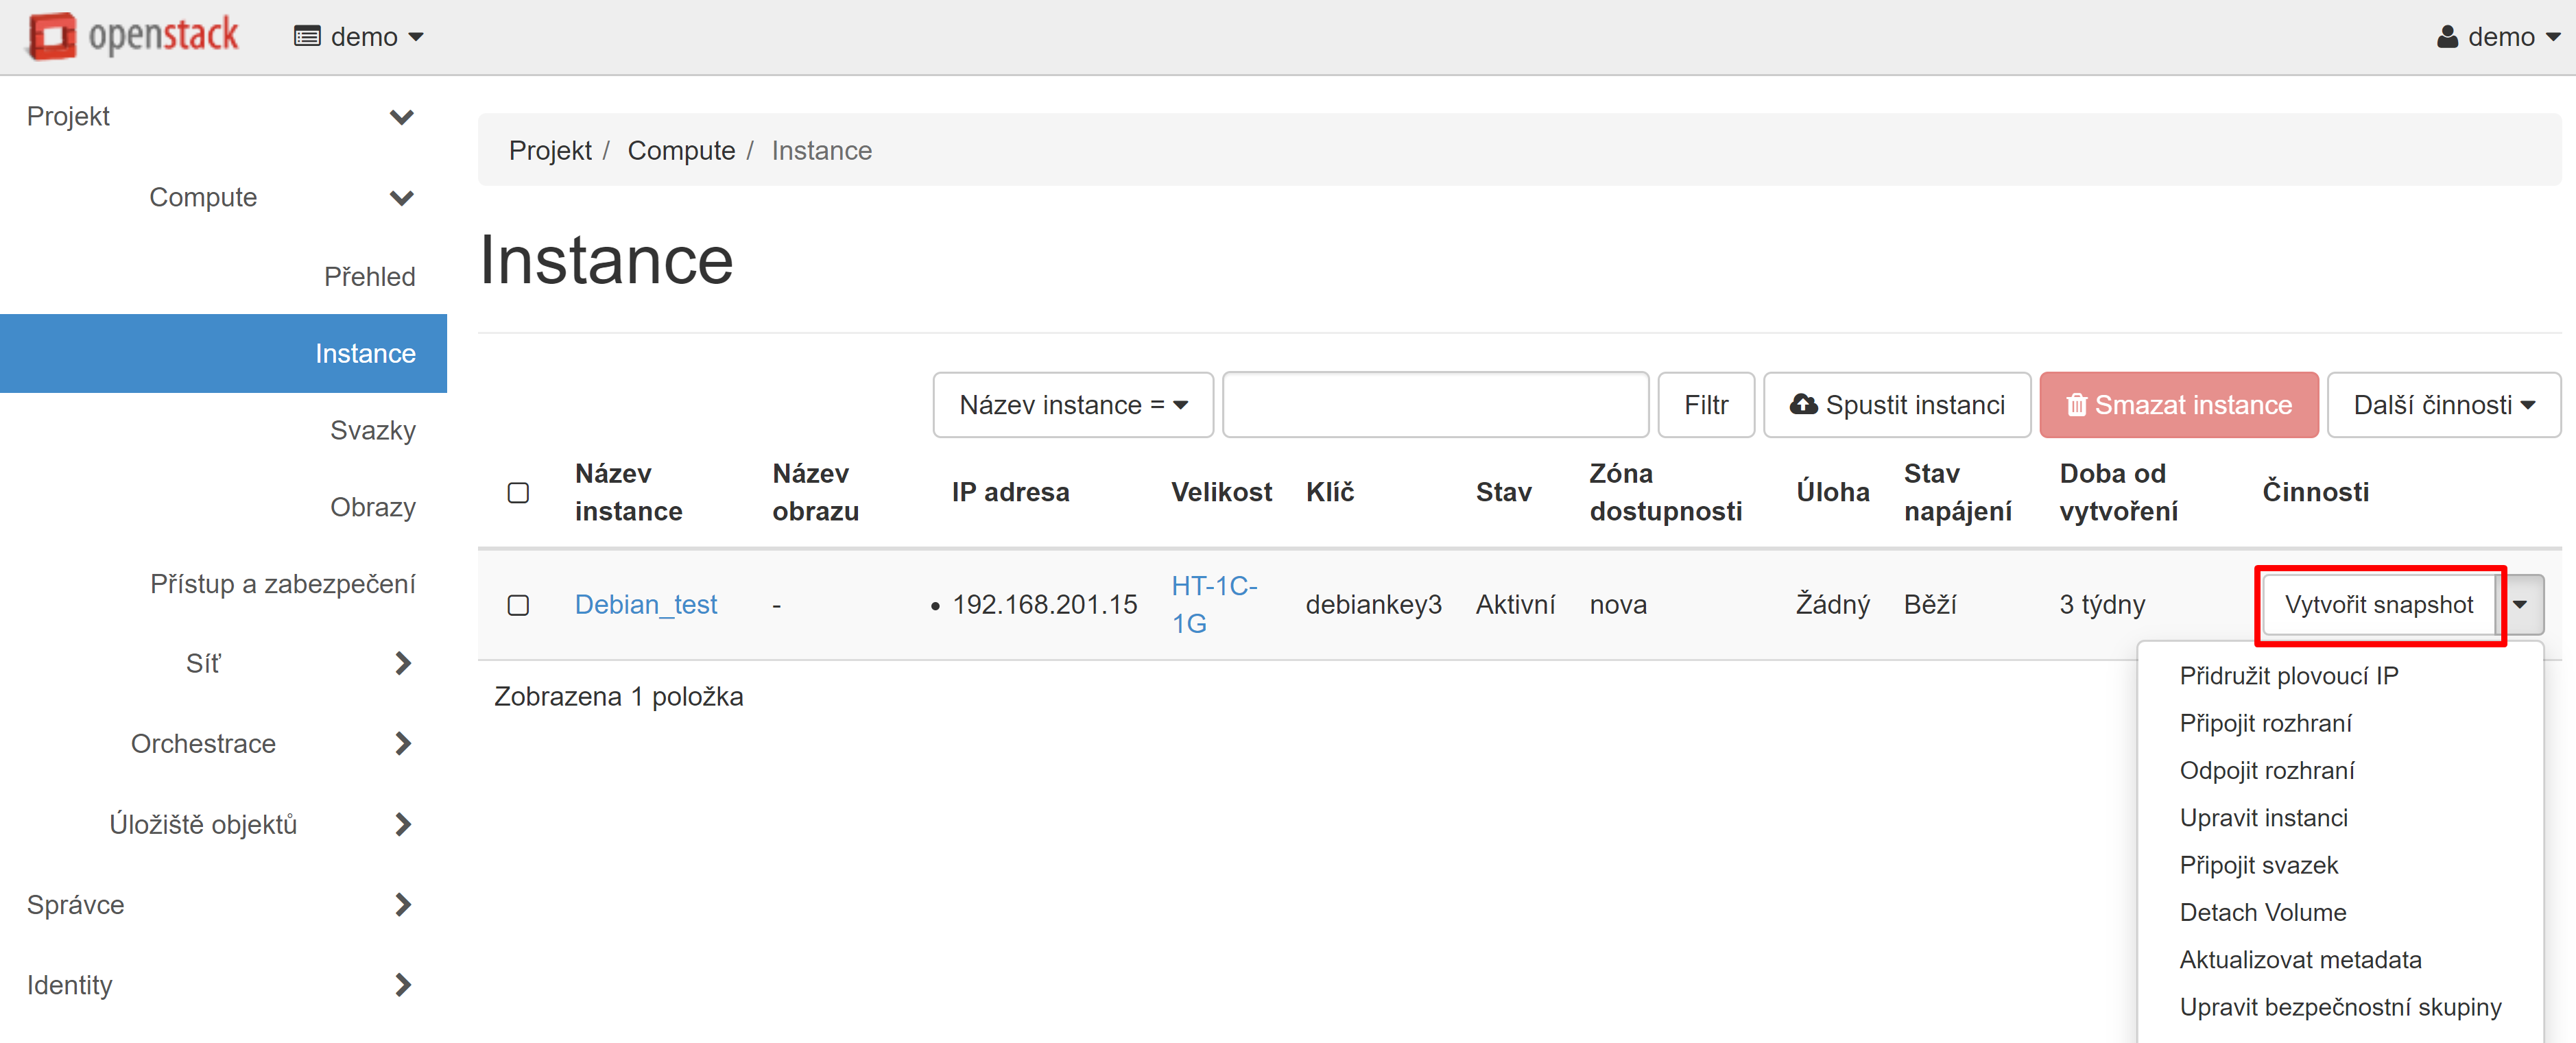
Chcete-li vytvořit snapshot, vyberte v rozevírací nabídce naproti instance, která má být klonována, položku „Vytvořit snapshot“.
V okně, které se otevře, zadejte název snapshotu a klikněte na tlačítko „Vytvořit snapshot“.

Tato akce vás automaticky přesměruje do sekce „Compute“ — „Obrazy“. V sekce „Projekt“ se zobrazí snímek vaší instance. V rozevírací nabídce naproti názvu instance vyberte položku „Spustit“.

Otevře se okno vytvoření instanci, kde můžete vytvořit virtuální stroj na základě právě vytvořeného snapshotu.
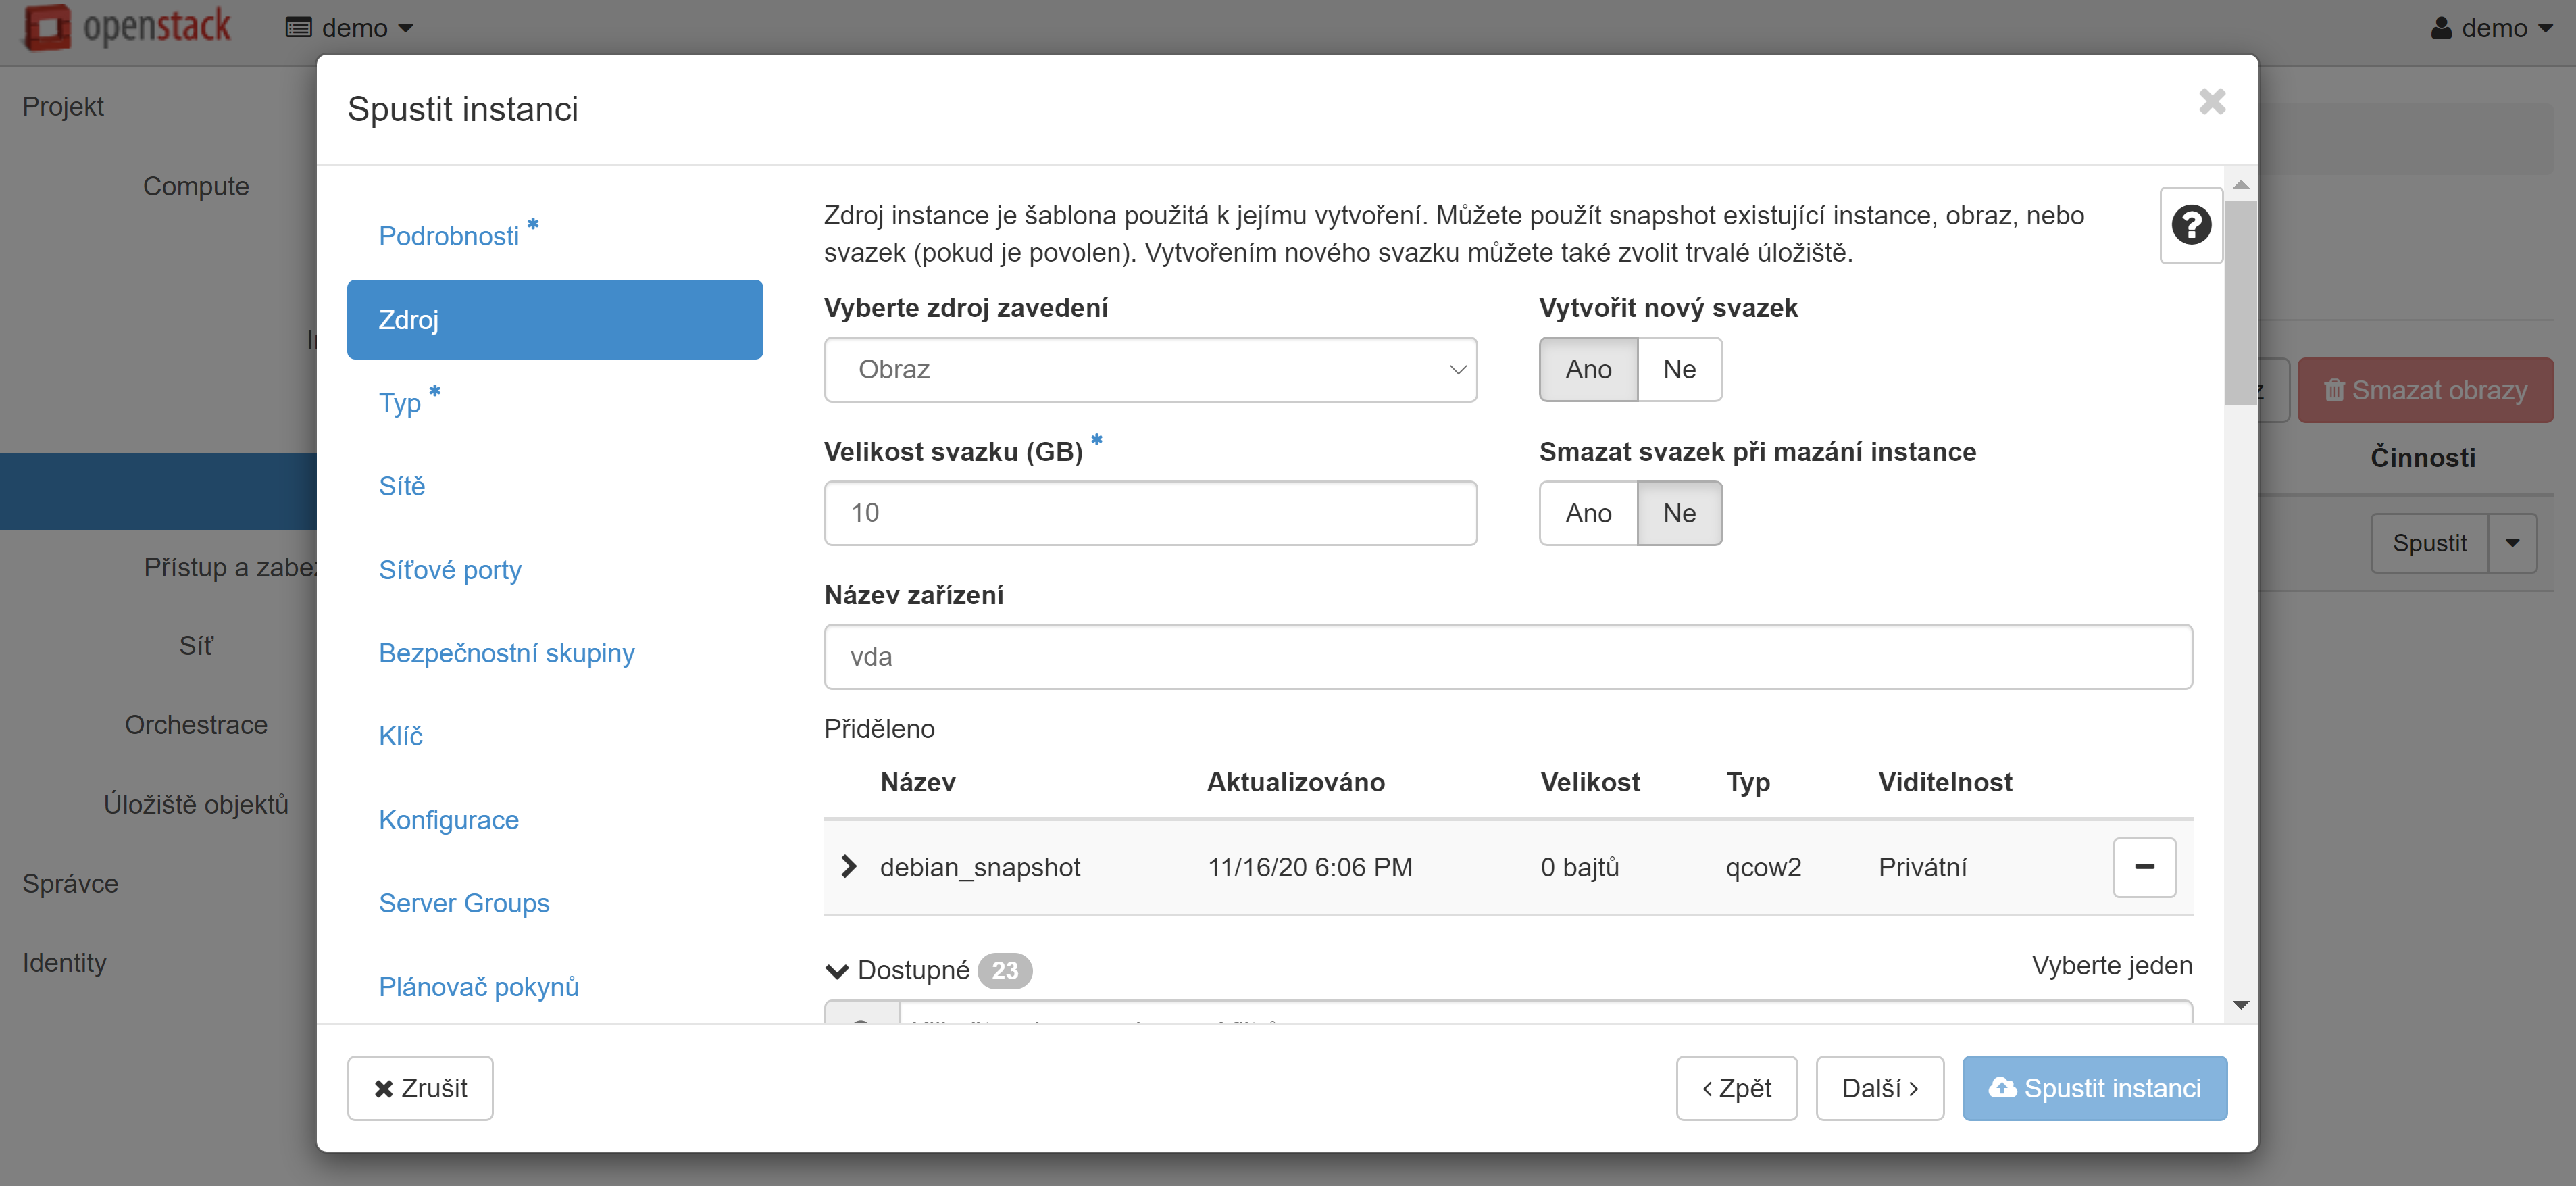
Přečtěte si více o vytváření a nastavení instancí z obrazů zde.
Pozor! Původní disk a samotný snapshot nelze odstranit, pokud existují další disky založené na tomto snapshotu. Pokud je třeba původní disk odstranit, použijte další metodu.
2. Použití snapshotu
Tato metoda je vhodná pro případy, kdy potřebujete odstranit původní virtuální stroj a zahrnuje vyložení svazků jako rezervní kopie nebo zálohy.
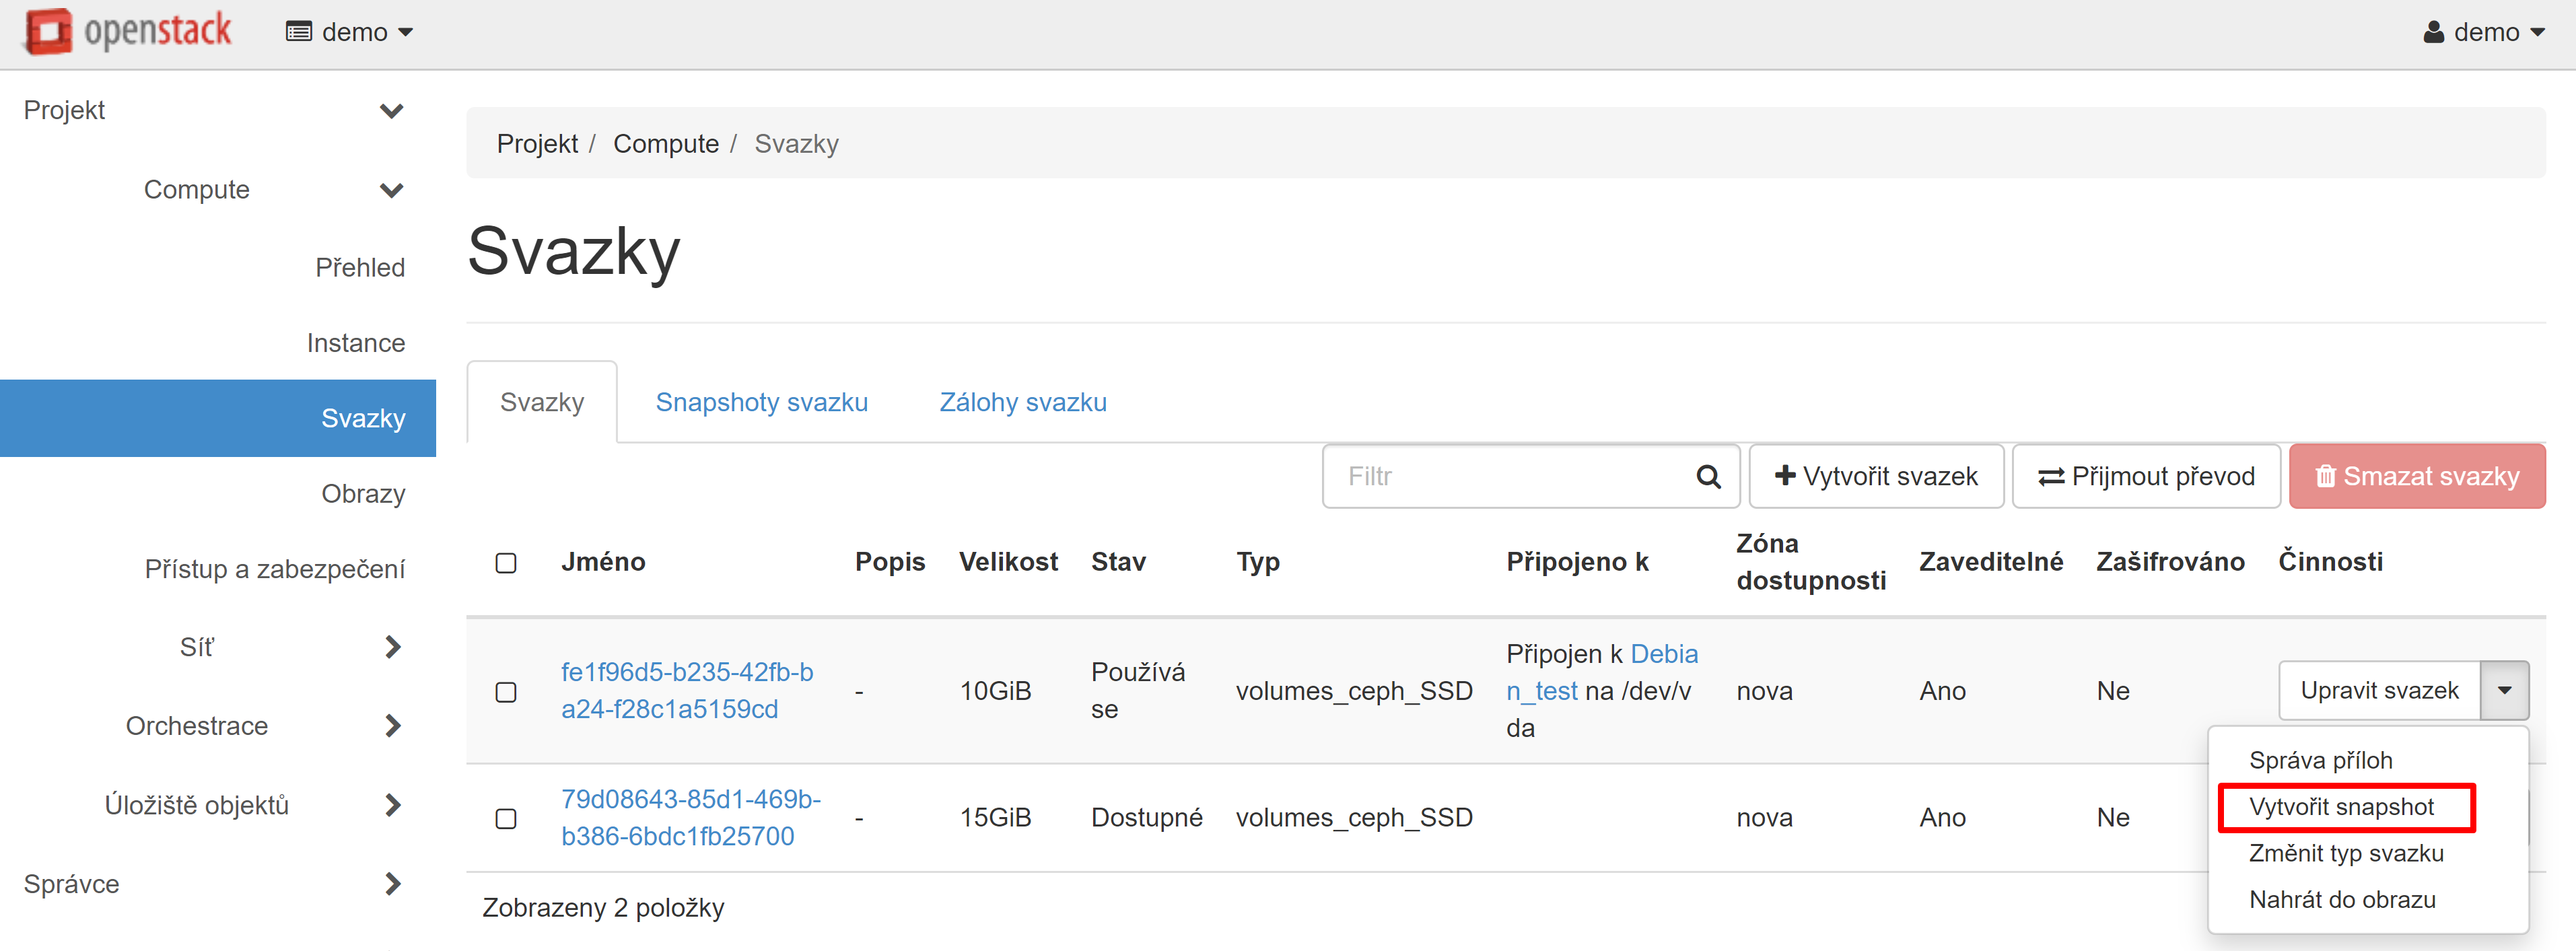
Přejděte do části „Compute“ — „Svazky“, naproti požadovanému svazku v rozevírací nabídce vyberte možnost „Vytvořit snapshot“.
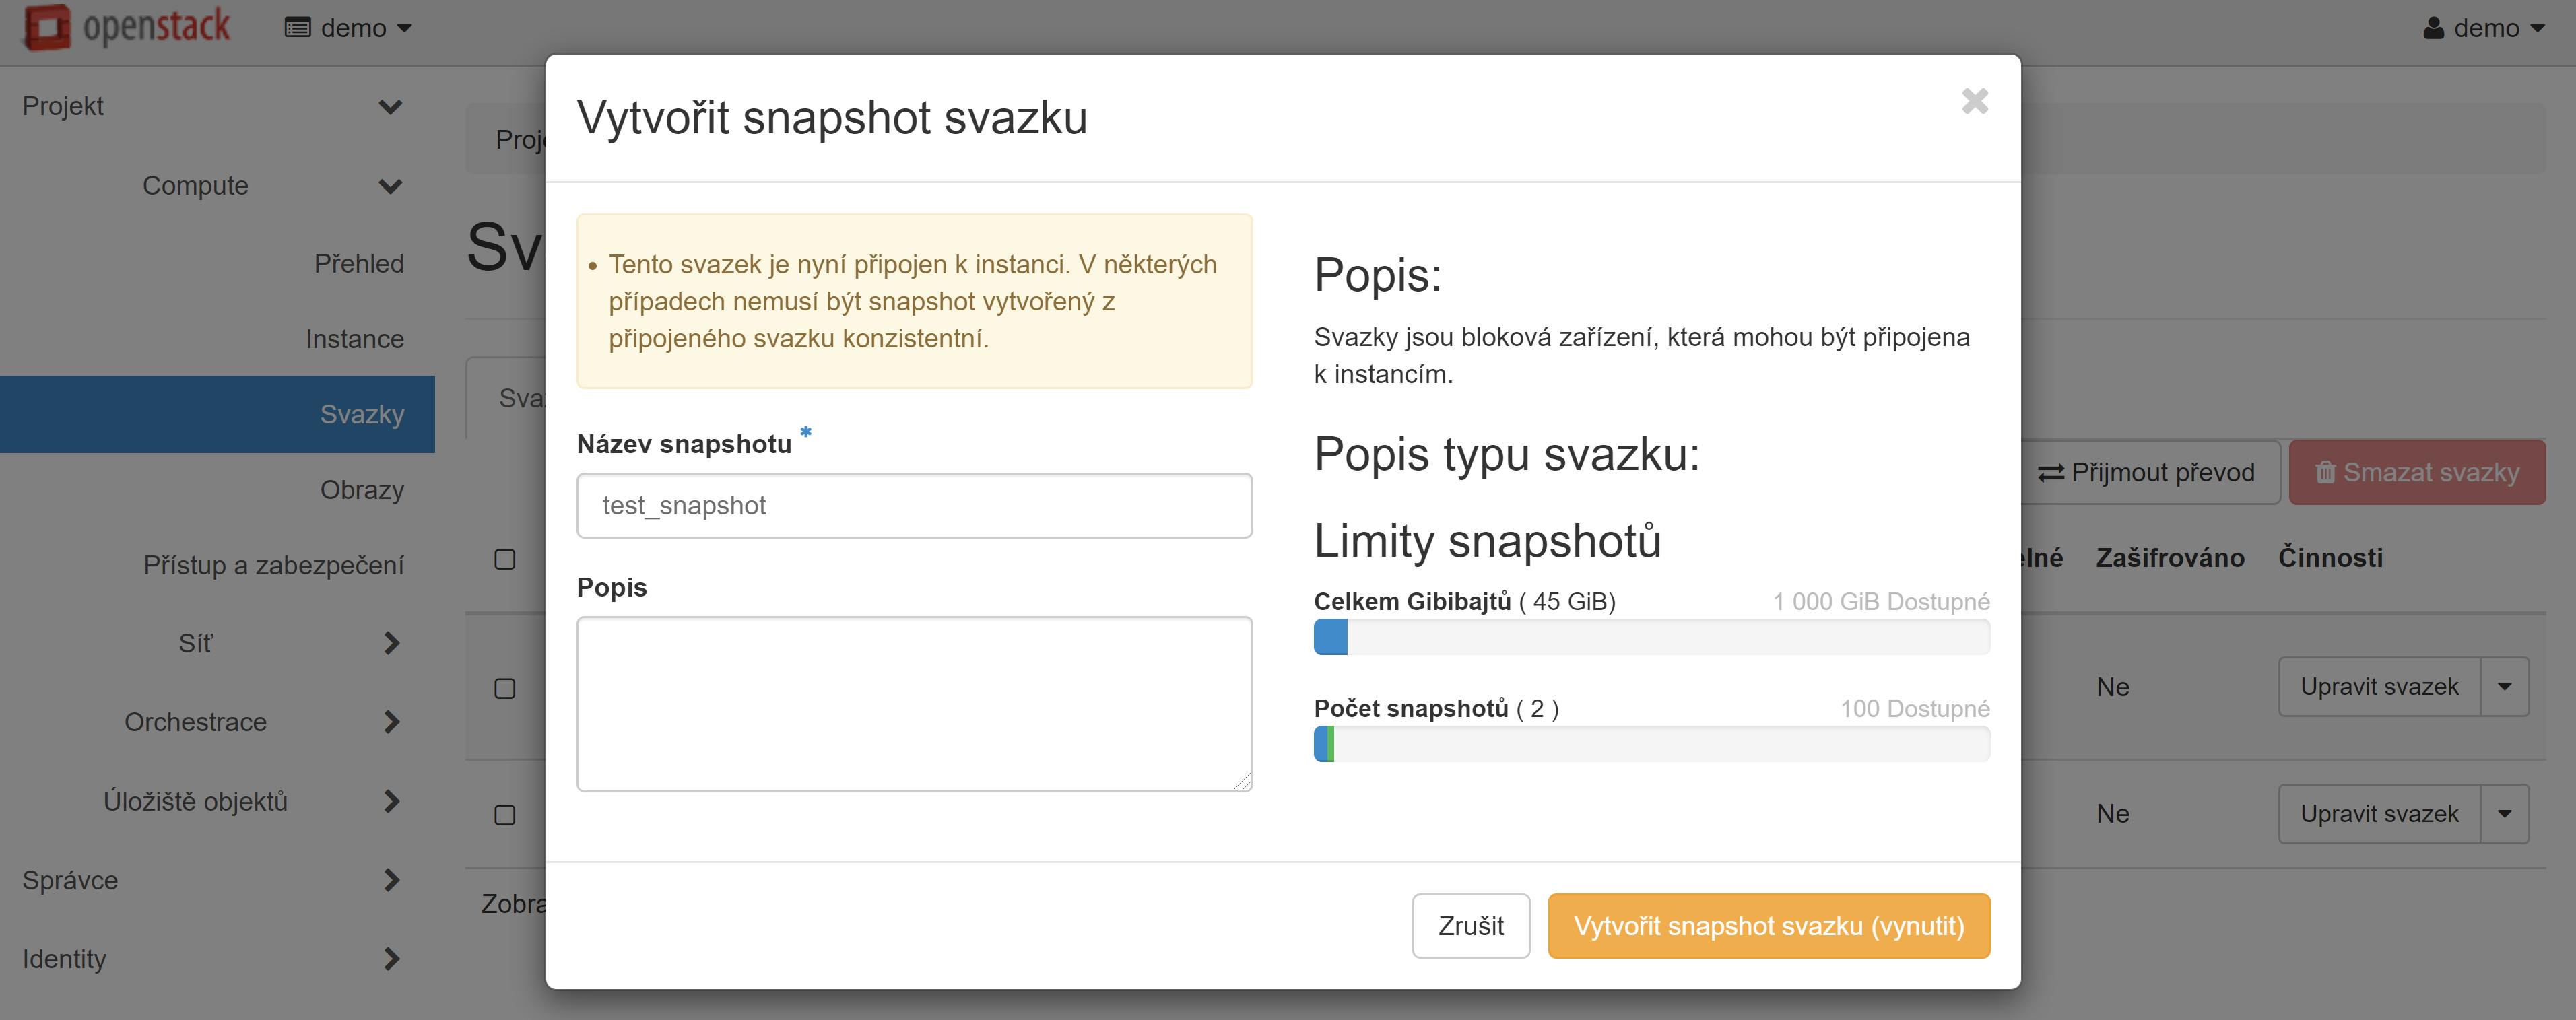
V okně, které se otevře, zadejte název snapshotu a klikněte na tlačítko „Vytvořit snapshot svazku (vynutit)“.
Budete automaticky přesunuti na kartu „Snapshoty svazku“ ve stejné sekci „Compute“ — „Svazky“, zde se v seznamu zobrazí právě vytvořený snapshot. V rozevírací nabídce naproti snapshotu vyberte možnost „Vytvořit svazek“.

V okně, které se otevře, vyplňte požadovaná pole a klikněte na tlačítko „Vytvořit svazek“.
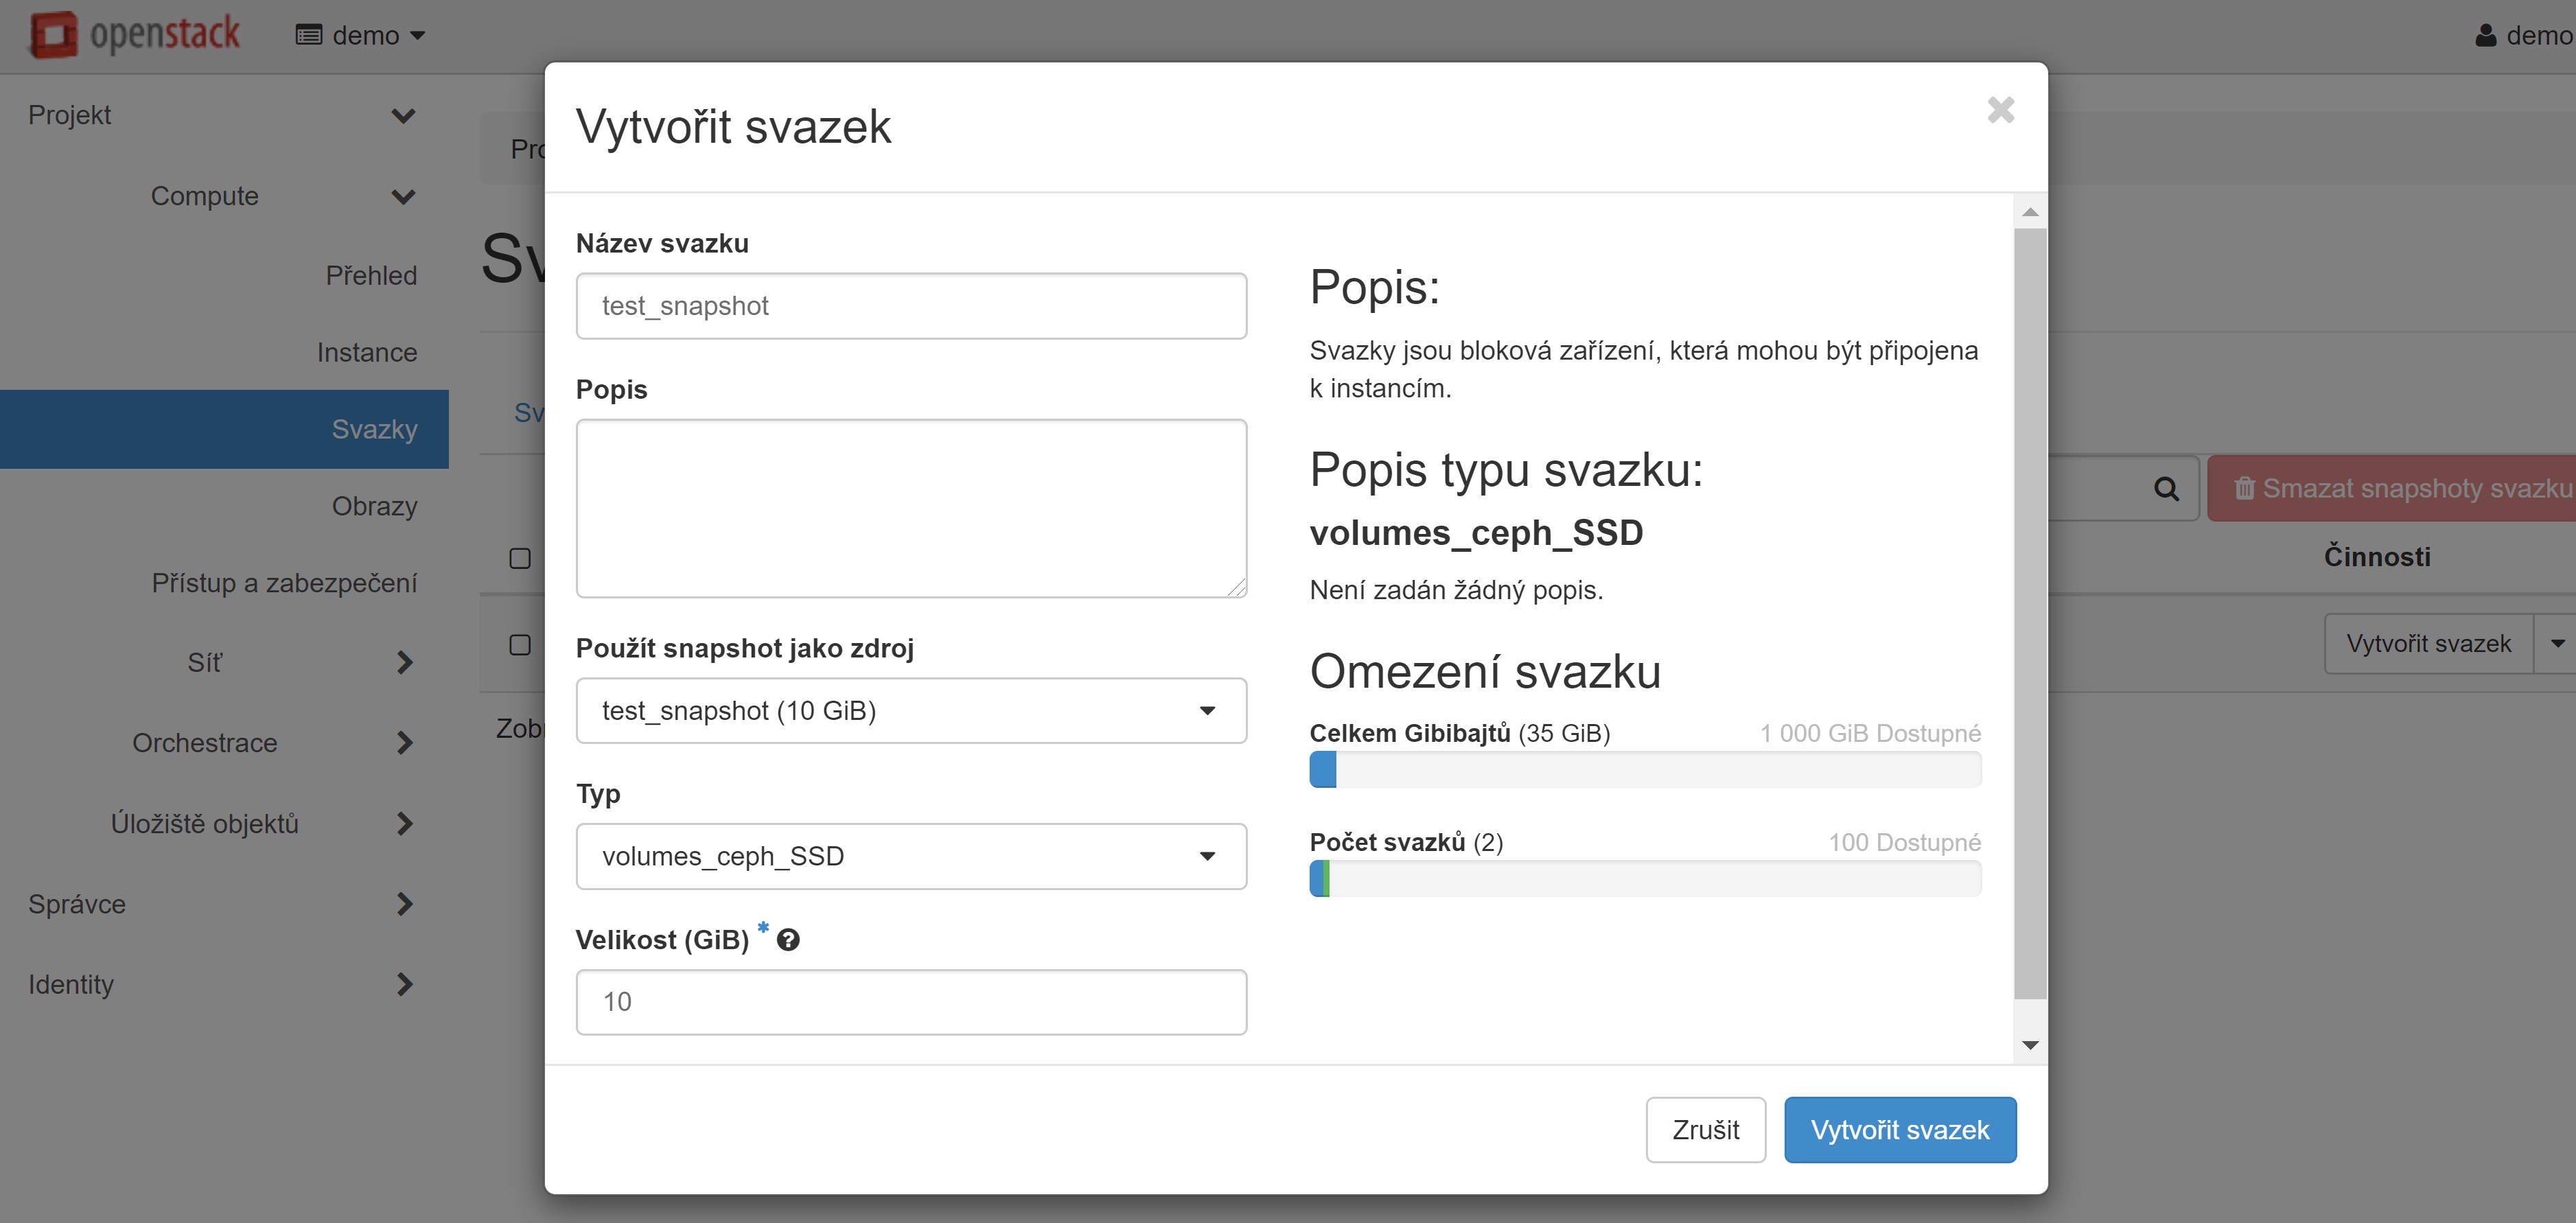
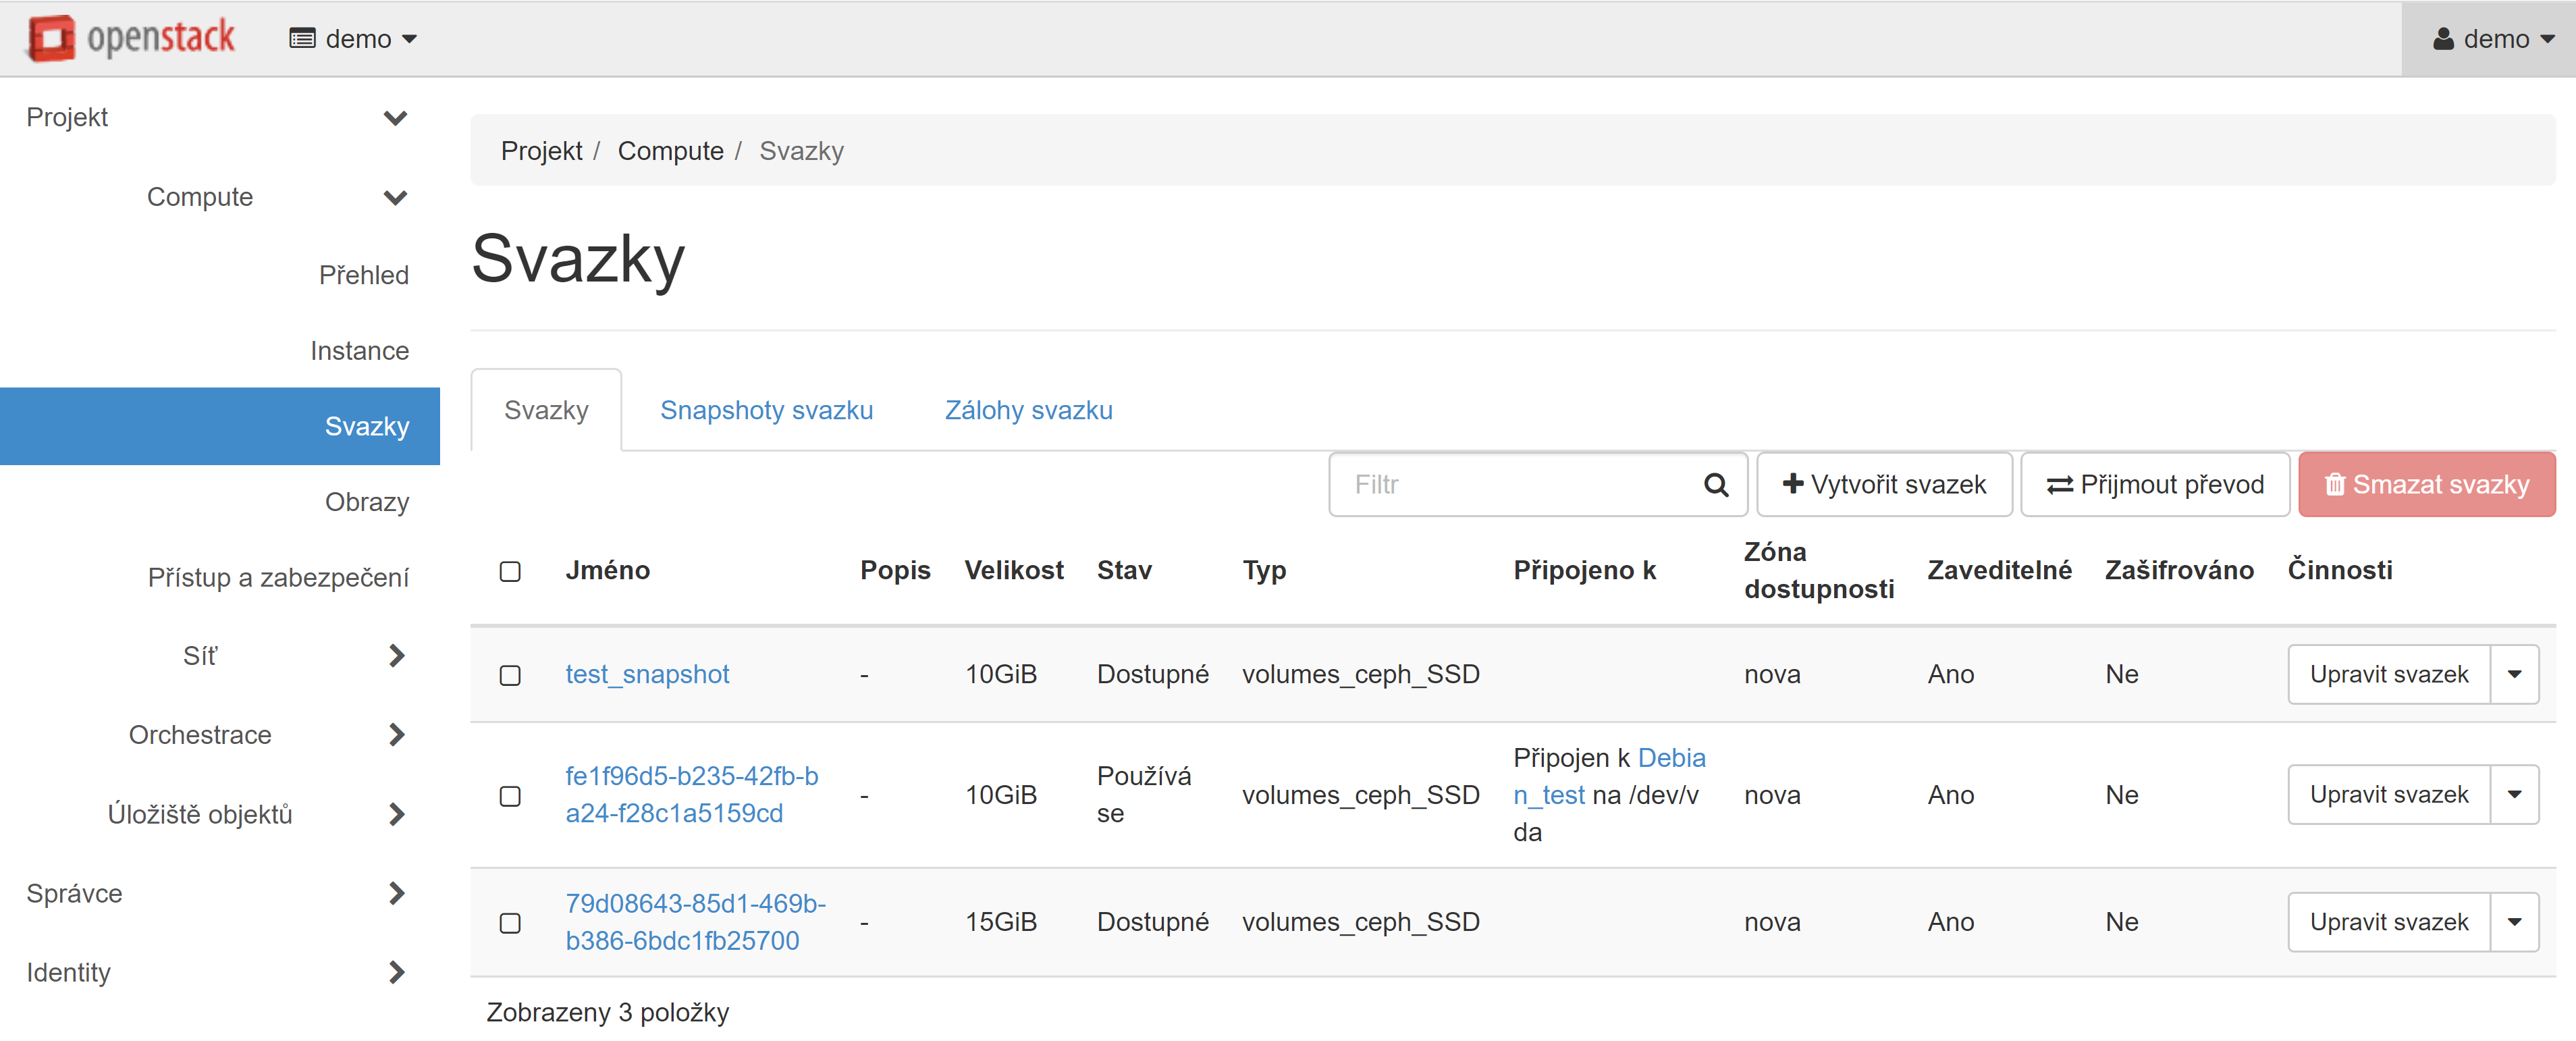
Disk, který jste vytvořili, se objeví na kartě „Svazky“ se stavem „Dostupné“.
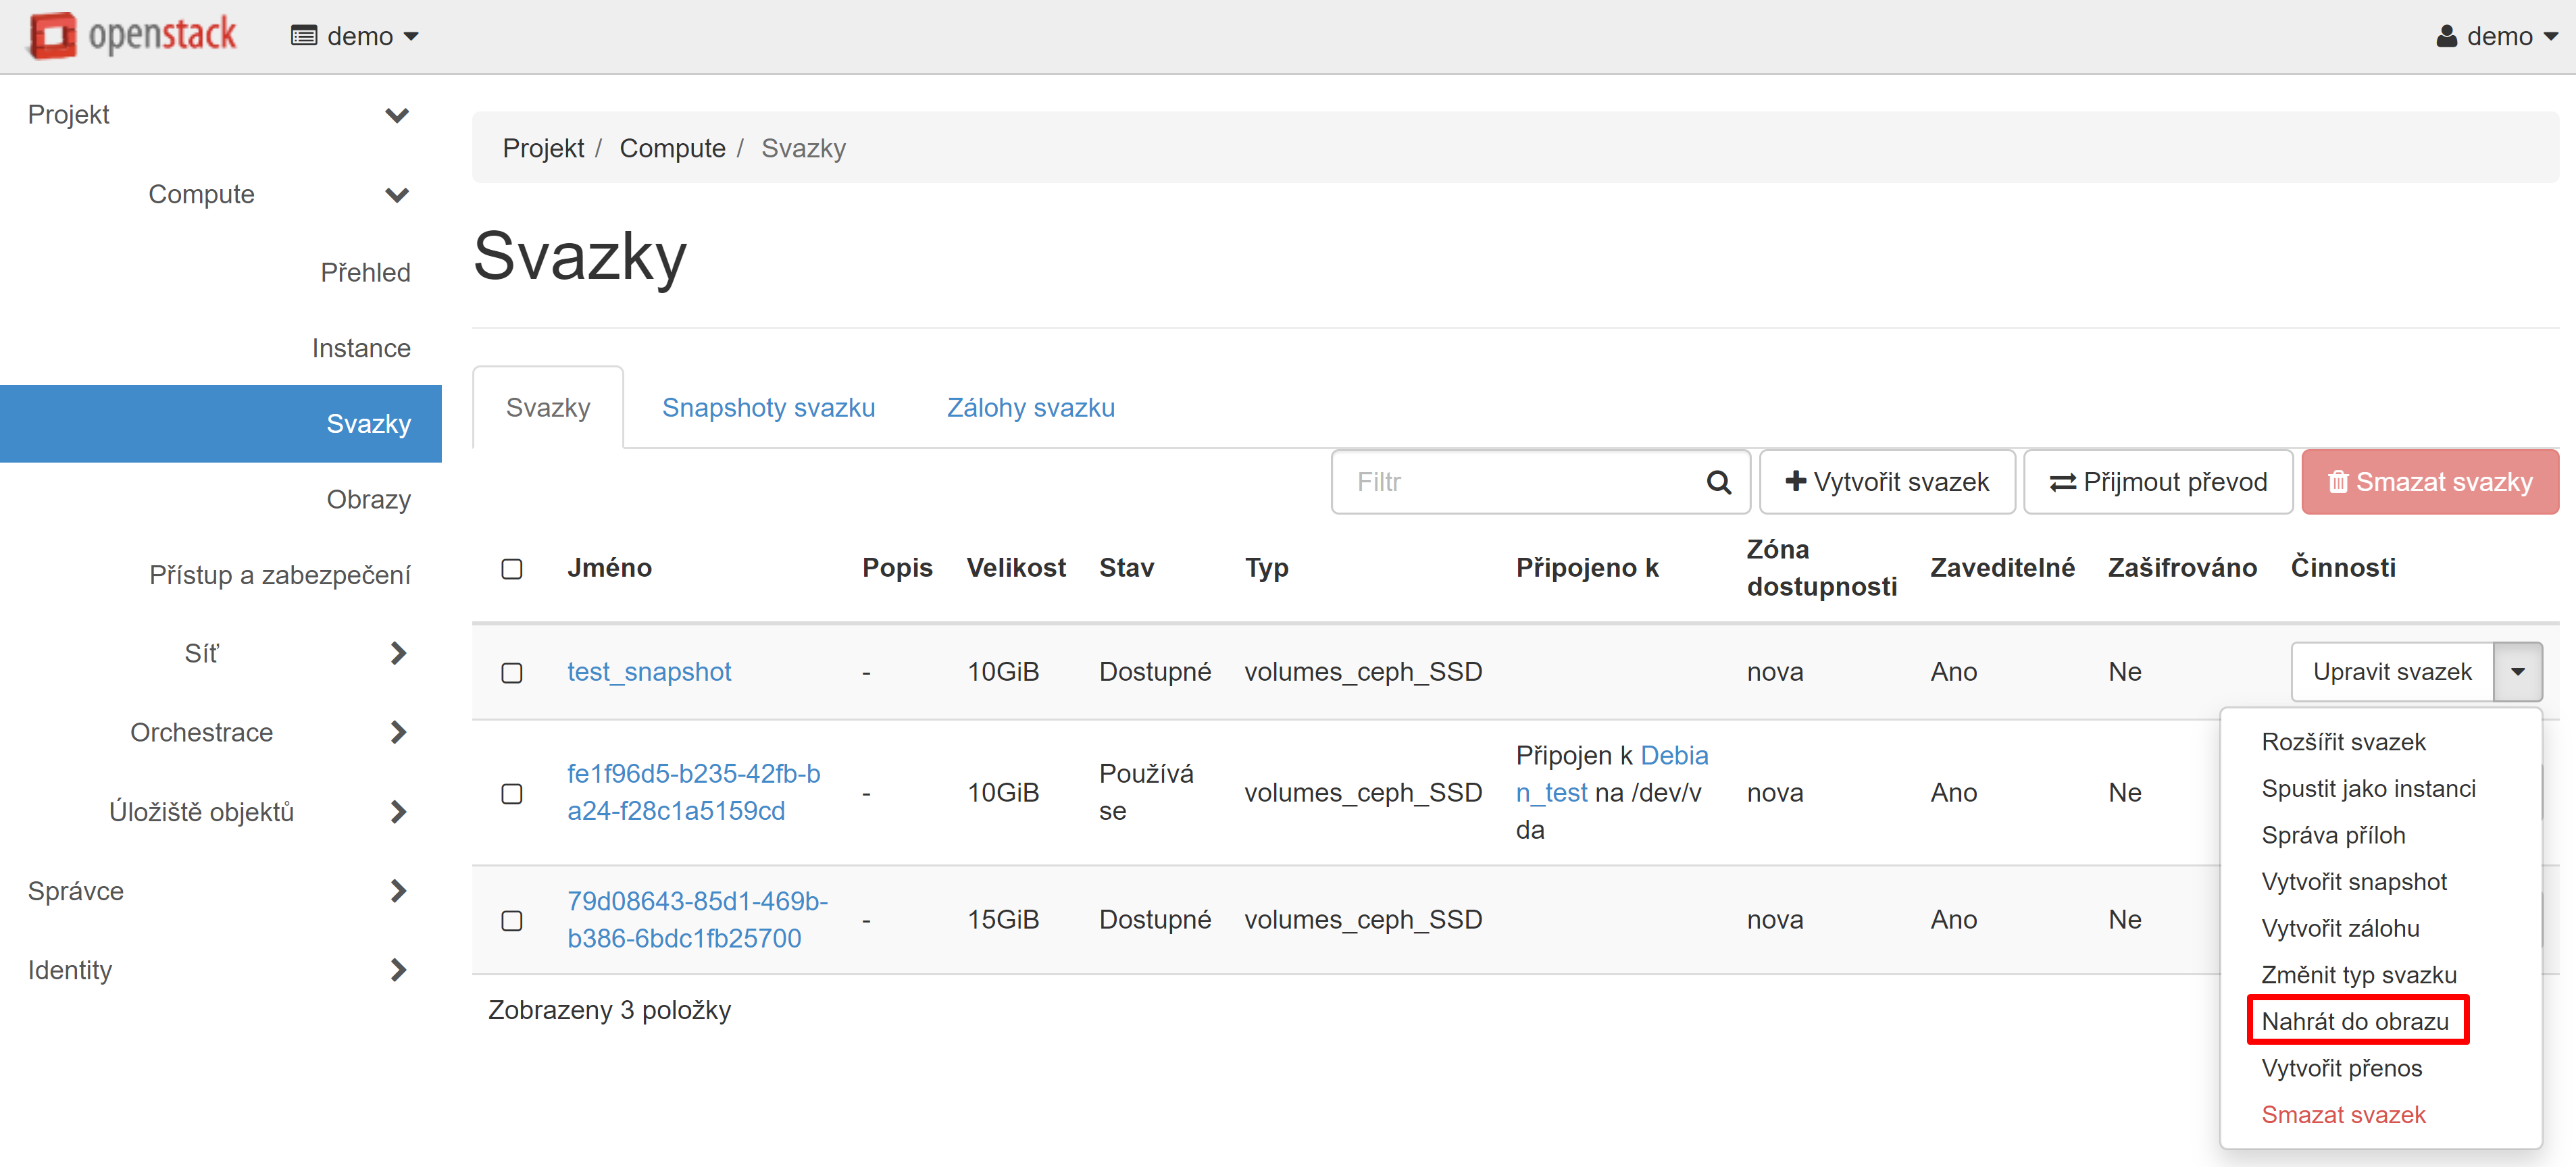
Pokud potřebujete vytvořit velký počet klonů, měli byste vytvořený svazek uložit jako obrázek, k tomu vyberte položku rozevírací nabídky „Nahrát do obrazu“ naproti vybranému svazku.
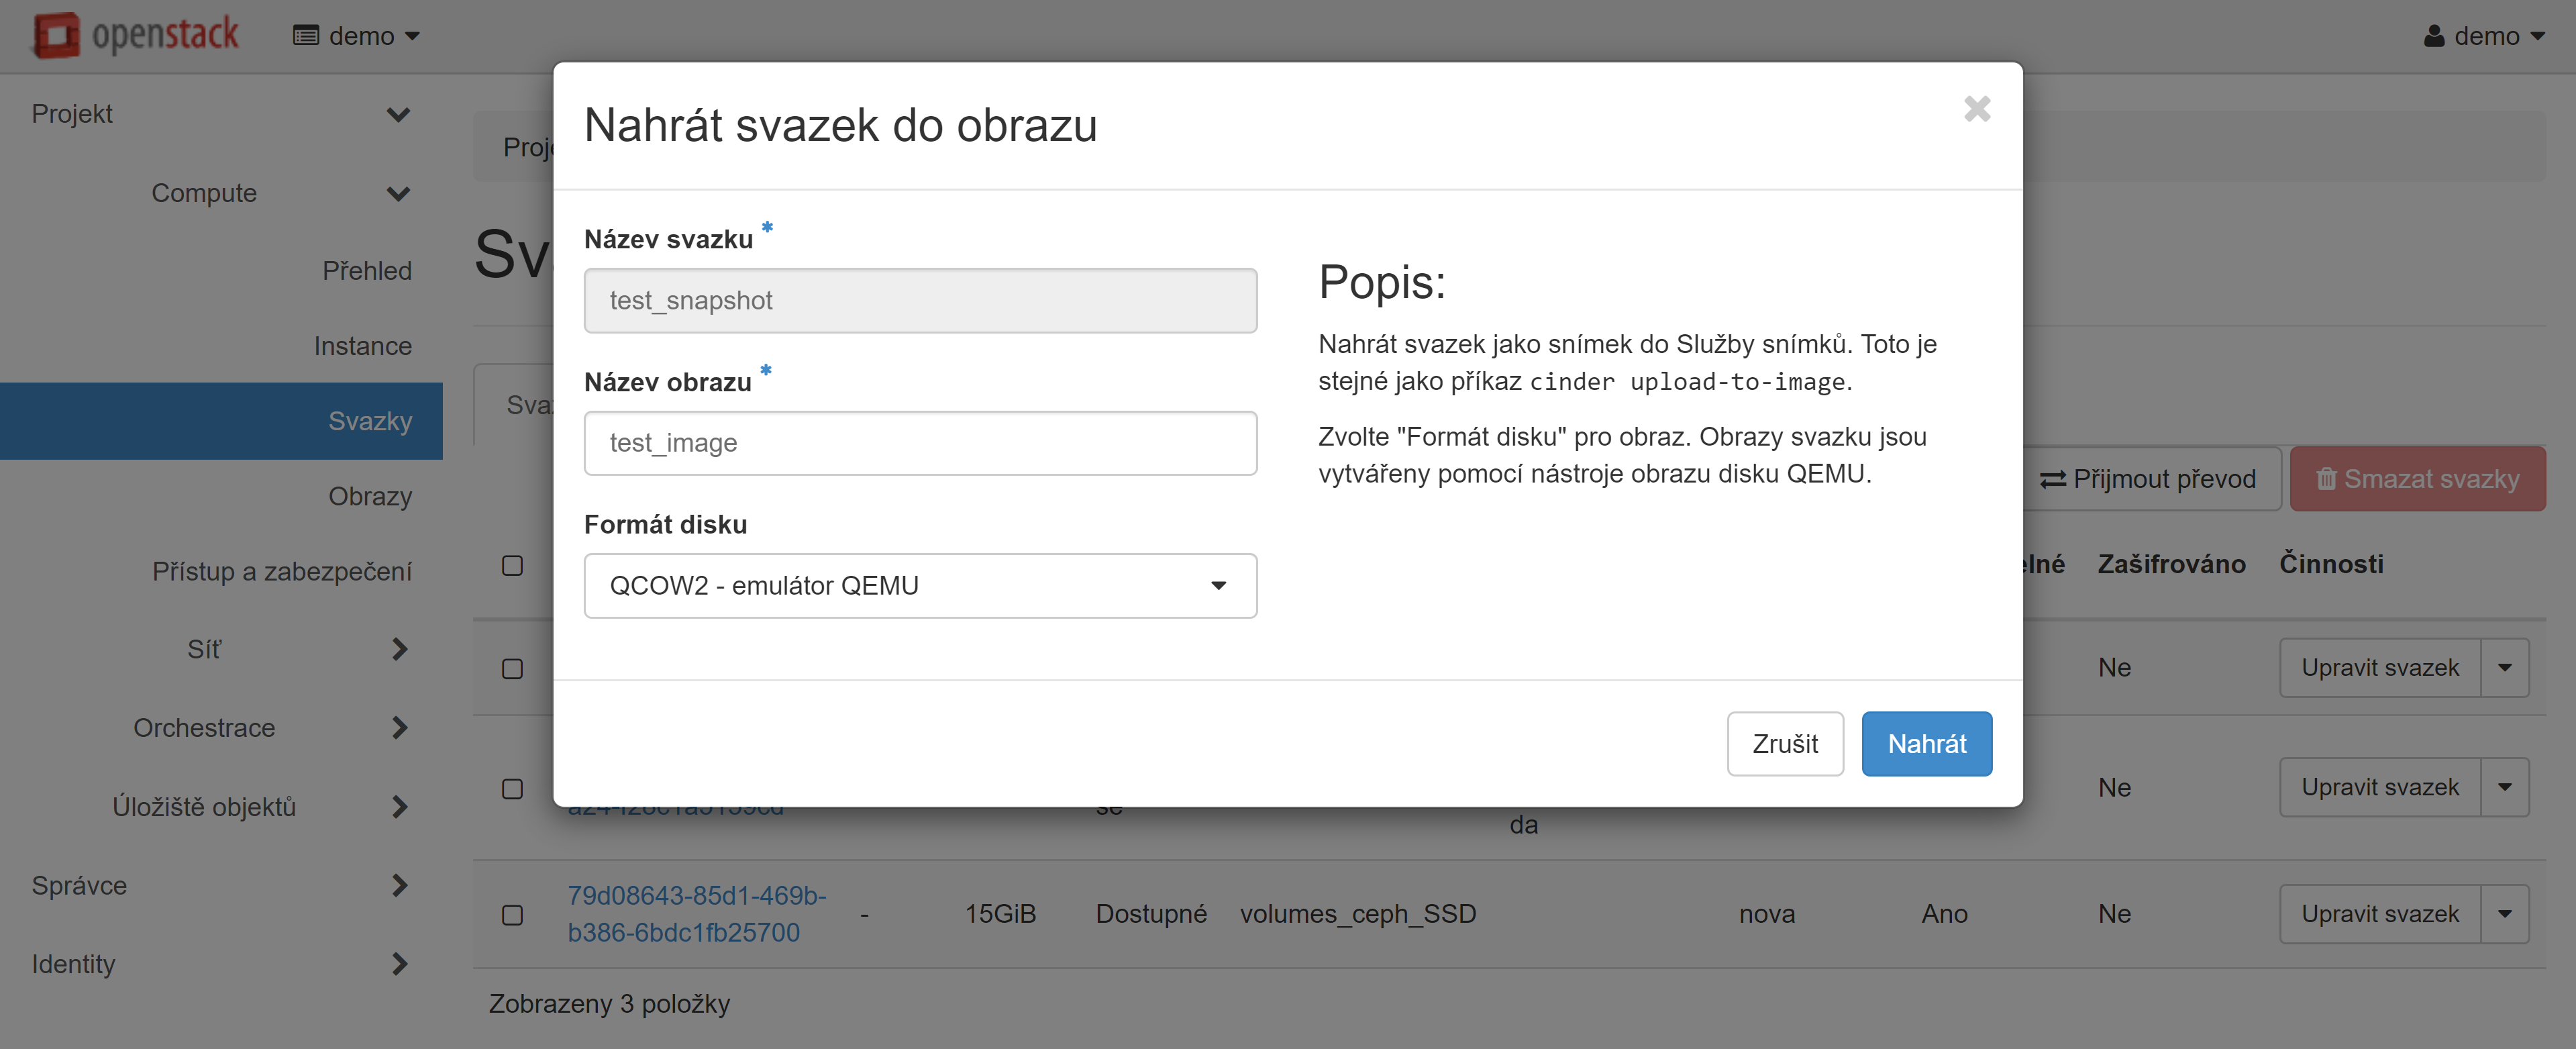
V okně pro nahrávání svazku do obrazu, které se otevře, zadejte název obrazu a nastavte formát disku. Doporučujeme zvolit formát disku „QCOW2 — emulátor QEMU“, což mírně zmenší využité místo v úložišti obrazu.
V sekci „Compute“ — „Obrazy“, v sekce „Projekt“ se zobrazí obraz vaší instance, na jehož základě můžete vytvořit své virtuální stroje. Přečtěte si více o vytváření instancí z obrázků v našem průvodci.

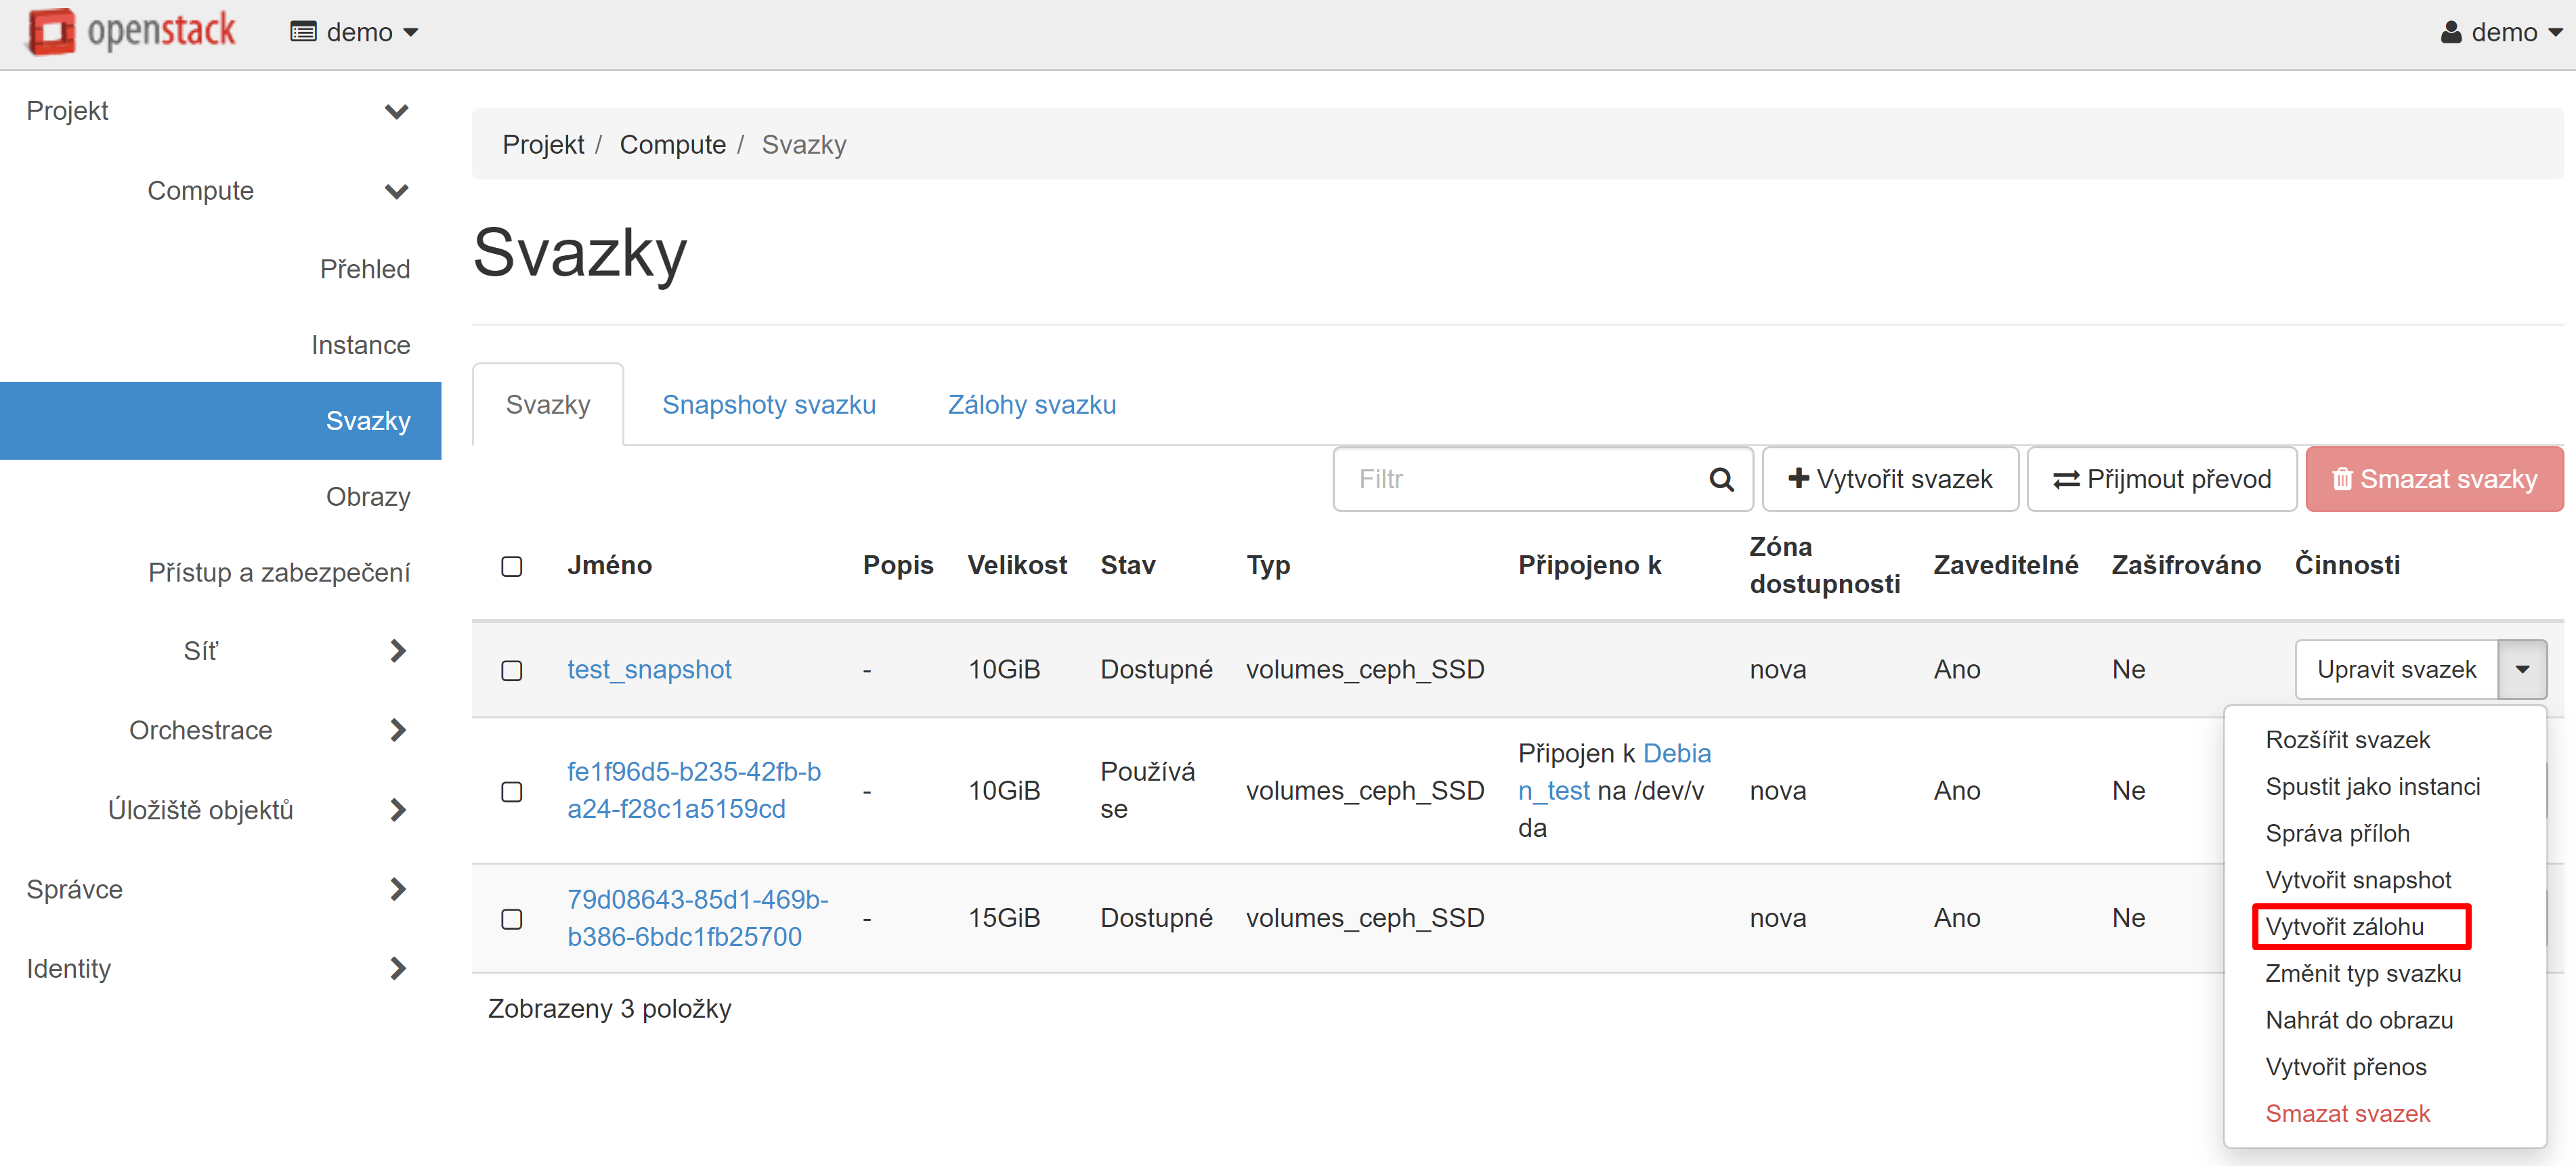
Můžete také vytvořit zálohu — prostřednictvím položky nabídky „Vytvořit zálohu“ naproti vámi vytvořenému svazku.
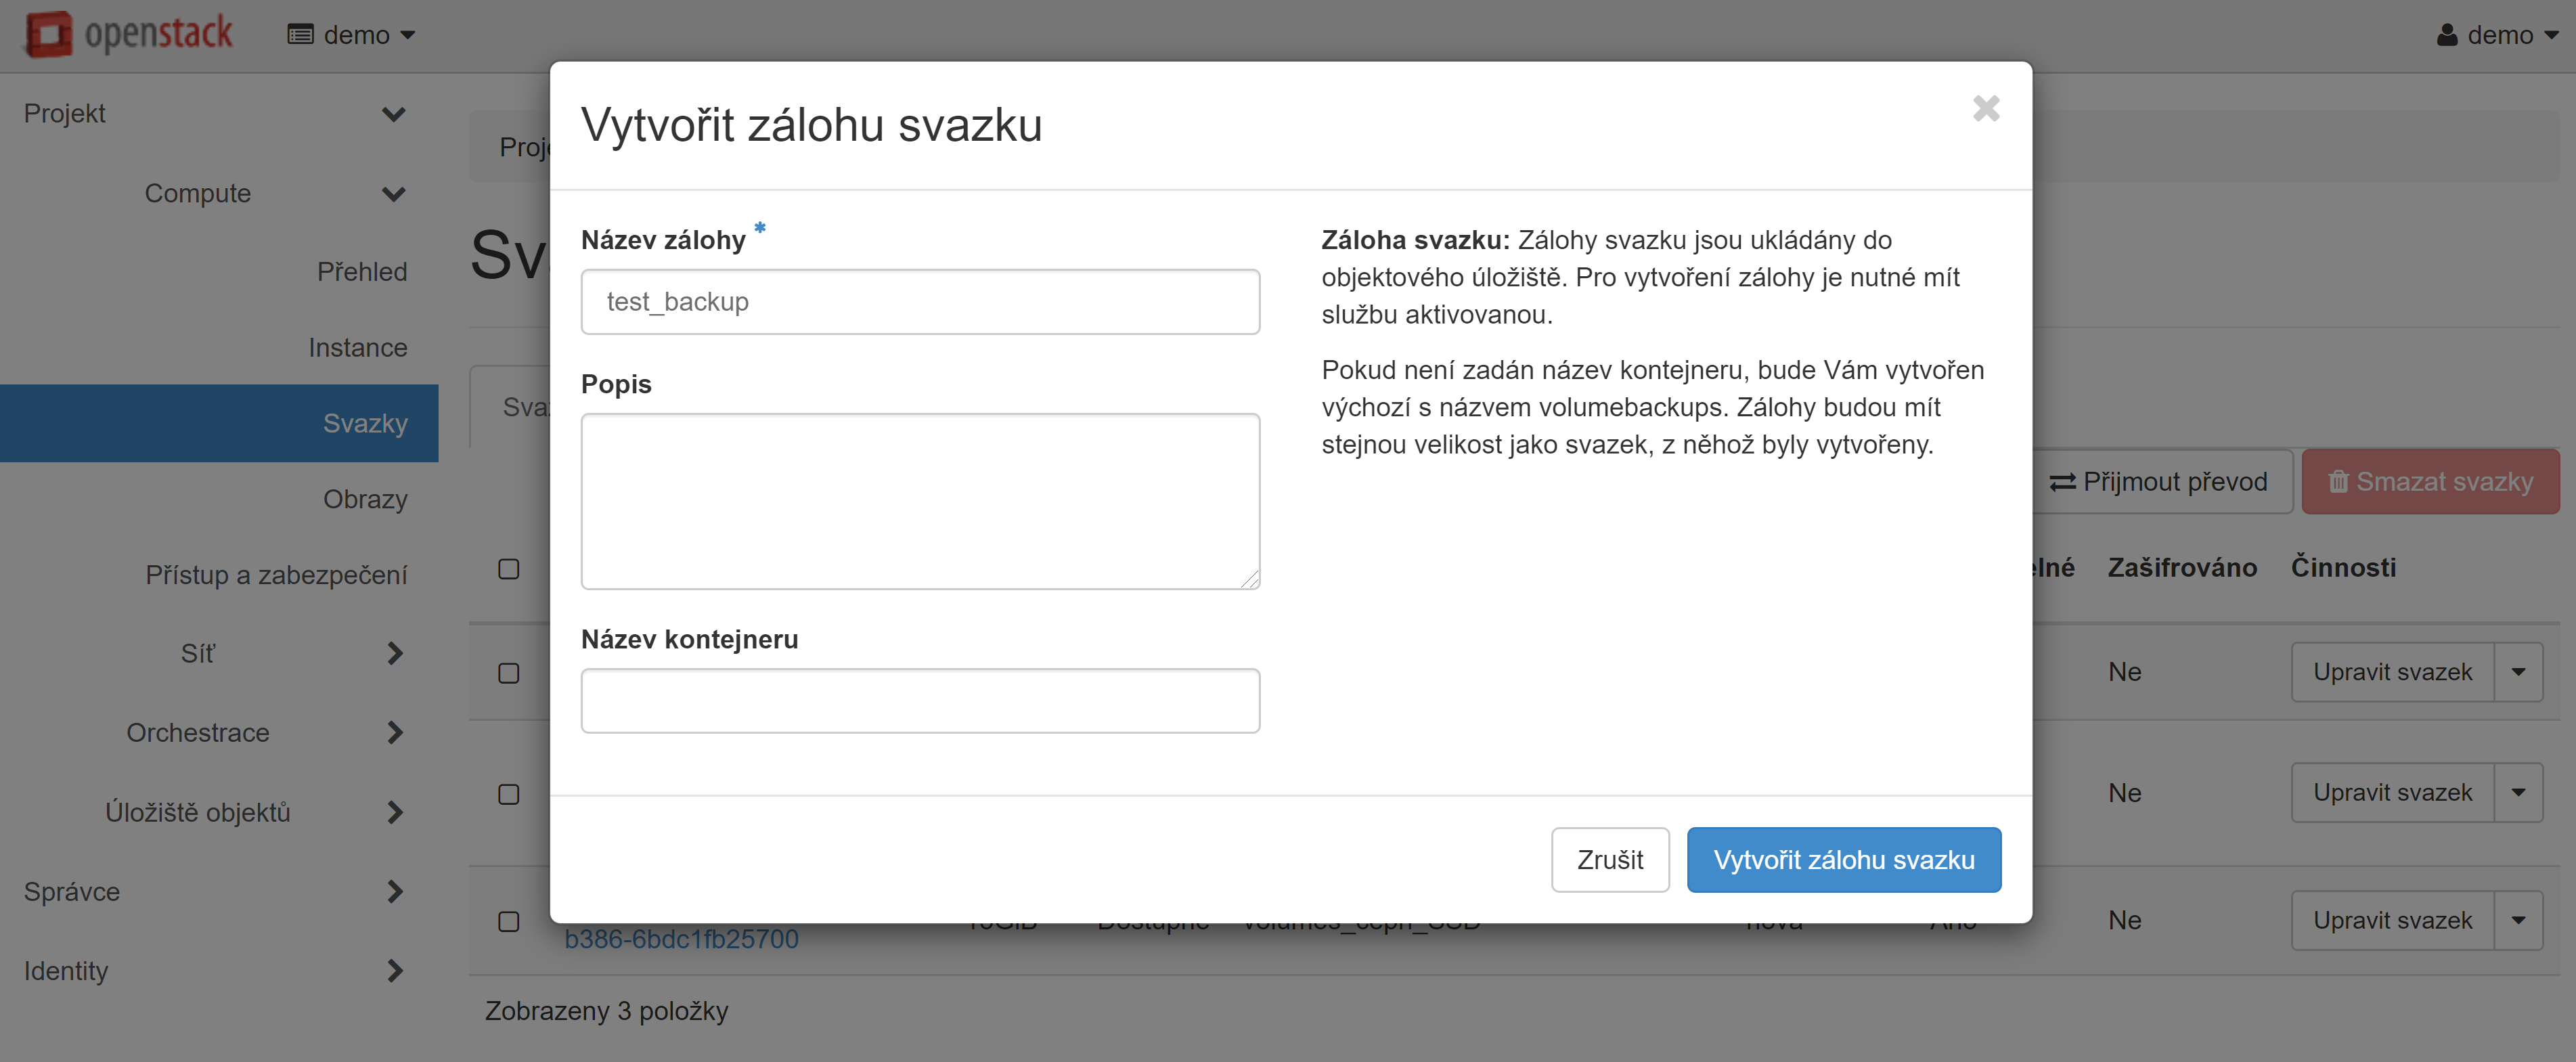
V okně, které se otevře, zadejte název zálohy a klikněte na tlačítko „Vytvořit zálohu svazku“.
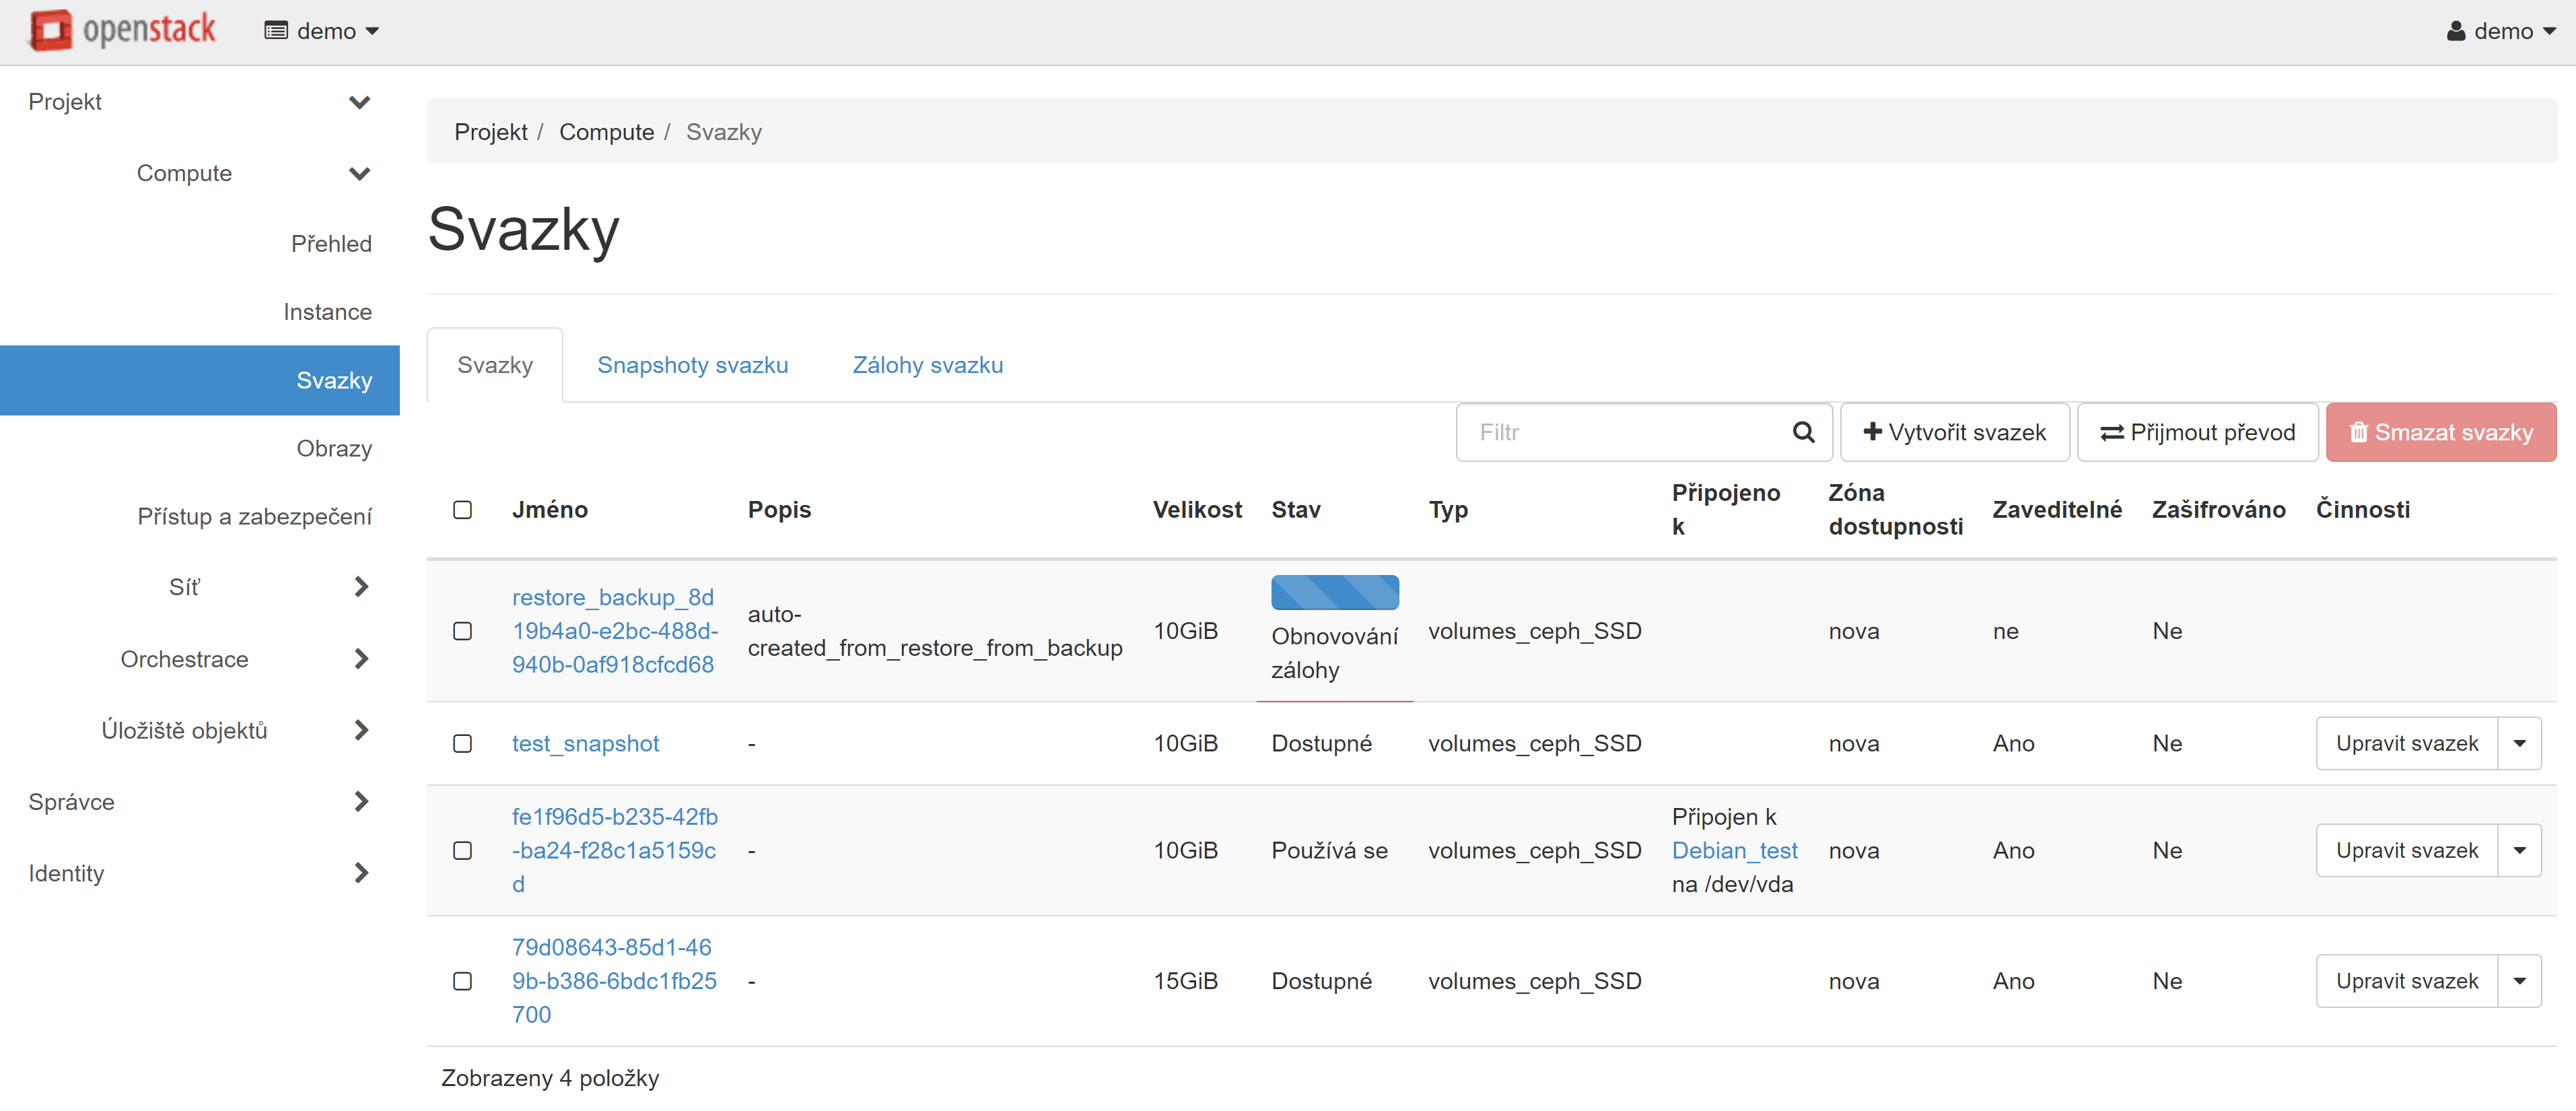
Vytvořená záloha se zobrazí v sekce Zálohy svazku. Chcete-li z této kopie vytvořit jeden nebo více disků, klikněte v rozevírací nabídce naproti požadované kopii na položku „Obnovit zálohu“.

V okně, které se otevře, vyberte v rozbalovací nabídce „Vybrat svazek“ položku „Vytvořit nový svazek“ a klikněte na tlačítko „Obnovit zálohu svazku“.

Nová jednotka se zobrazí v seznamu. Můžete jej připojit pomocí dalšího svazku k jiné sekce Compute nebo na základě něj vytvořit novou instanci.
Po stažení rezervní kopie nebo vytvoření zálohy lze snapshot a původní svazek pro zálohu a rezervní kopii v případě potřeby odstranit.
Zdrojová instance a její zdrojový svazek jsou nezávislé na zálohách a obrazech a lze je také v případě potřeby odstranit.
